TL;DR - Here’s a web app to list labelled traffic cam images from the RI DOT website. I used YOLO (You Only Look Once) to detect objects (vehicles) in the images and FastAPI to serve the results to a React app. The displays the cam images and results and uses LeafletJS to display the cameras on a map. The backend is hosted on Railway and the front end on Github Pages. All the code is available on GitHub.
Motivation
I recently completed the deeplearning.ai Deep Learning Specialization on Coursera as a refresher. I have done some work that involved training an end-to-end CNN model for semantic segmentation on 3D sonar data, but I had not worked with object detection or NLP, so I took the course. Plus I was pumped that it was updated to use tensorflow and Python. Not to mention everything is developing super quickly in that field, so there were a bunch of new things to learn and conventions that had been updated based on new best practices. It’s also great to be able to take advantage of transfer learning, and use a model architecture that is well established - so much easier to get going than building your own from scratch based on a similar approach in a paper (which is what I did for the 3D sonar project using a model for 3D MRI segmentation).
RIDOT publishes streams for their traffic cams mostly along the highways, so decided to use the project as an opportunity to learn more about some tech I’ve wanted to play with for a while (eg FastAPI and React). I decided to use the Rhode Island DOT traffic cam images as the source of images for the project. So I set up an app to detect cars in the images (they update about every minute), store the results, and display them in a React app.
Architecure
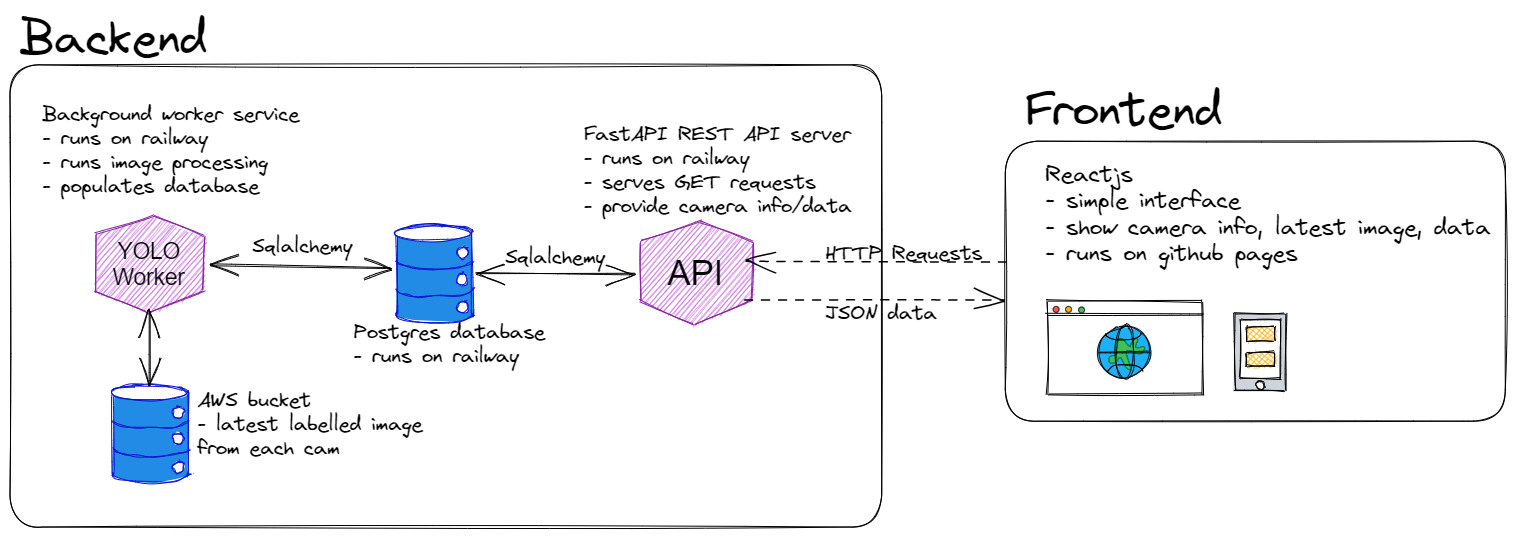
The app is a full stack application stuffed into a single repo. The backend is a FastAPI REST API that serves the results of the object detection. The actual object detection model, YOLOv8 by ultalytics, is run by a python worker service. The latest labelled images from each camera are dumped into an S3 bucket.The frontend is a React app pulls the results from REST API and displays them. The backend is hosted on Railway, and includes three Railway services - the Worker, the API Server the and Postgres database. The front end just runs on Github Pages.
Here’s a diagram of the overall architecture (made with Excalidraw):

Training the Worker
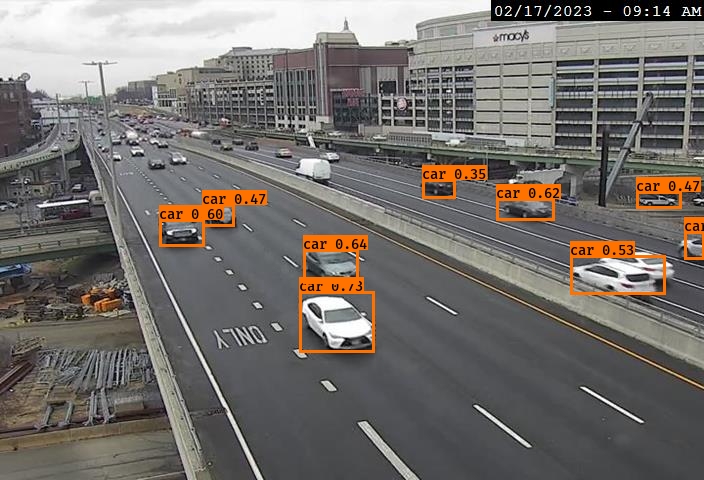
For the first pass at this tast, I actually used the YOLOv2 implementation introduced in the deeplearning.ai object detection assignment. It was pretrained on a dashcam dataset intended for self driving cars. Performance was OK, it depended a lot on the camera angle of the traffic cam. Here’s an example where it did pretty well:

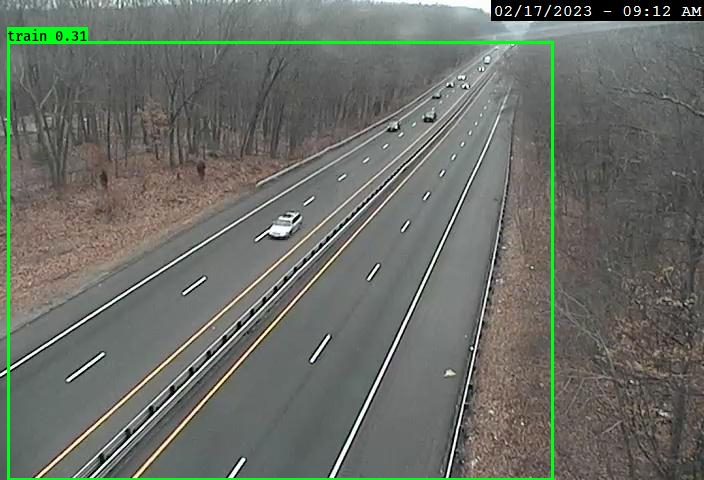
And here’s an example where it did not do so well:

It’s still great that it worked at all given it was trained on dash cam data. It definitely needed to be fine tuned on some real traffic cam data, and that was the plan. But while searching around the internet, I found some great open source models (YOLOv8 by ultalytics) that seemed a lot better than the set up I was using, so I swapped it out.
There is a public dataset developed in the writing of this paper constisting of a bunch of labeled (vehicles only) traffic cam images. That’s perfect for this application - so I used a subset of that data from Kaggle to train the model for about 13 more epochs (a couple hours). The results were much better!
The model does a pretty good job detecting vehicles, it detects way more vehicles in the frame than the previous version - and it still has not been fine tuned on data from the specific traffic cams I’m using. So that’s on the next step list of course!
To deploy the model I set up a service on railway to run through the traffic cam images, detect vehicles, and push the results (images go to an S3 bucket, vehicle counts go in a Postgres DB). It runs every 5 minutes at the moment, but that might be adjusted. The camera streams from RI DOT update about once a minute, but I don’t want to accumulate / store too much data.
Camera Location Data
This part was a grind, no way around that. I could not find any listing of the actual locations of the cameras in terms of latitude and longitude. They are only labelled in the DOT data with approximate locations (eg I-95 at Branch Ave, etc). I really wanted to drop them on a map (using Leaflet.js) - so I just sat on the couch with the TV on the background and plugged away at estimating their locations. I just roughly compared the camera feed to Google StreetView in the area described by the description. They aren’t perfect, but it’s better than “Camera at I-95 and Branch Ave” - especially for showing on a map view! (or doing any kind of geospatial analysis…)
Lessons Learned
This is a list of some small things I remember getting stuck on, or that I learned while working on this project. I’m sure there’s more that I’ve forgotten - and there’s definitely a lot more to come as I continue to work on this project.
Cross-Origin Resource Sharing (CORS) setup for FastAPI
I had to set up CORS for the API server to allow my React app to make requests to it. I used the FastAPI CORS middleware. This was a bit tricky for me at first, I was pretty bummed when I first started trying to hit the REST API from the frontend and couldn’t get it working due to a bunch of Cross-Origin Request Blocked errors.
For context, I’m a desktop developer (mostly C++ and Python) - so I haven’t had to deal with CORS before. It was pretty simple to fix by following the docs and pulling in that middleware:
# This is the extra config needed to allow GET requests from anyone
# after importing the middleware
app.add_middleware(
    CORSMiddleware,
    allow_origins=["*"],
    allow_credentials=False,
    allow_methods=["GET"],
    allow_headers=["*"],
)
Basically you need to configure your server to allow specific origins (your client) to make requests to it for each http method (GET, POST, etc). The REST API server is currently set up to allow all origins to make GET requests only.
Dropping Images into S3
The worker drops images into an S3 bucket - the two gotchas that I ran into with this were related to the headers set on the “file objects”.
You can see in the snippet, I had to make sure to explictly set the ContentType and CacheControl headers. Maybe obvious to a web dev - but I missed it at first.
  with open(os.path.join('runs/detect/predict', image_name), 'rb') as f:
    s3.Bucket(S3_BUCKET).put_object(
      Key=image_name, Body=f,
      ContentType='image/jpeg',
      CacheControl='max-age=300')
The ContentType attribute lets the browser know it’s an image - otherwise it will try to download the file. The CacheControl attribute tells the browser to cache the image for 5 minutes. I chose five minutes because I’m only running the worker through the cams every 5 minutes, so I don’t want to be making a bunch of requests to S3 for the same image. The images for each cam are stored with the same name and overwritten each time, so if you don’t set the CacheControl header, the browser will not know to update the image and even though the image has changed, it will still show the old, cached version of the image on the front end.
Worker Service on Railway
Run Pytorch on Railway (via Ultalytics/YOLOv8)
Railway set up is pretty easy for simple projects. If what you’re running is simple enough, their Nixpacks system will build your project into a docker image and deploy it to their as a service with basically no configuration (except maybe the start command). This set up was trivial with the API Server, but took quite a while to get right with the Worker service due to the dependencies of the YOLOv8 module.
In the end - by running Nixpacks and playing around in the docker image it made locally, I figured out that in order to run YOLOv8 by ultalytics I needed to install a libGL library and modify the default library path. Simple to type out now, but it took a while to figure out (please don’t look at the commit history 😅).
[variables]
  LD_LIBRARY_PATH="$LD_LIBRARY_PATH:/usr/lib/x86_64-linux-gnu/"

[phases.setup]
  aptPkgs = ['...', 'libgl1']
Drop Git LFS to Railway working
The previous model I was using (YOLOv2) was a lot larger - so I originally had set up Git LFS to store the model weights. I found out that when railway cloned my repo, it didn’t pull down the LFS files. This was a problem for running worker! Eg: we’re gonna need those weights, sir. This also took me while to figure out, because I couldn’t get it to replicate locally. The new YOLOv8 model is much smaller, so I just stored it in the repo without using LFS. I’m sure I could have run a build command to pull down the LFS files, but I didn’t want to spend more time on it and the weight file is only like 5 MB.
More Monorepo woes on Railway
I wanted to keep my monorepo structure because it’s nice and simple for a small project like this. I also have the YOLO worker and the API Server set up to use the database schema. I could have avoided some of this trouble by having the worker GET the cam list and POST new data to the API Server instead of creating a direct DB connection, and I’ll do that in the future. But for now, I wanted to keep it simple. That meant two railway services from the same repo, that both use the same database schema. So there are two services on Railway that both launch from the backend directory (the API server and the worker). The cool thing that you can do is tell Railway (or it was really nixpacks here) to build your app using a specific config file via an environment variable (eg NIXPACKS_CONFIG_FILE) in the service settings. So there are now two .toml files in the backend directory - api_nixpacks_config.toml.toml and worker_nixpacks_config.toml.toml, to launch the API Server and the Worker respectively. This is super convenient, it did take a while to figure out how to get it working though. I finally figured out that I could use nixpacks to create the build plan (see nixpacks plan) it would have used by default for the python services, and just modify the plan slightly for each service. ✅
React Router on Gihub Pages
I set up the front end as a React.js single page app. I’ve been wanting to learn React for a while, so this was a good excuse to do so. I used the latest version of React Router to handle routing for the SPA, but when I got started I didn’t realize that hosting on Github doesn’t give the option to redirect all endpoints to the root path.
So for example, if you clicked on the Map link in my nav bar, you would see the url update in the address bar to /Map and React Router would step in and show the Map component - everything would appear to work great. But if you then refreshed the page, the request would actually go to the server (Github Pages in this case), and return 404 because /Map isn’t an actual route.
If you control the server you’re running on, the “right way” to set it up for an SPA is so that the server directs all routes to index.html. Then on the client side, react-router will look at the route and figure out which component to render.
Unfortunately, this isn’t possible with Gihub Pages. And there are two workarounds I found. The first is to copy or redirect your 404’s to index.html - you can actually redirect them, or even just copy index.html to 404.html (maybe as a deploy step). Then the server will 404 for any route that doesn’t technically exist, but the client side will still be able to handle the routing (and error handling for routes that really for real don’t exist). This felt too hacky, even for me - so I didn’t go this route (see what I did there?).
The second option I found was to use the HashRouter instead of the BrowserRouter - this will add a # to the url after the base of the route (so /#/Map instead of /Map). The trick is that the server will ignore everything after the #. This is not really recommeneded in production, I think mostly for SEO reasons, but it’s not important for this project.
This is what I went with - it was an easy fix, pretty much just swapping in createHashRouter for createBrowserRouter:
// Using the hash router for now so that I can use GitHub pages to host it (it
// doesn't allow all server routes to be redirected to index.html)
const router = createHashRouter(
  [
    {
      path: "/",
      element: <TablePage />,
      loader: camListLoader,
      errorElement: <Error />,
    },
    {
      path: "/map",
      element: <MapPage />,
      loader: camListLoaderNoStatus,
      errorElement: <Error />,
    }
  ]
);
Plans for Improvement
You can see my plans / backlog / idea graveyard 🪦 - I have a lot of random ideas that would be fun to implement. Some of them are just things I should really fix 😬- eg things I hacked together to get things working, that I now understand much better; other things are just things I want to try out 🤓. I want to get docker/docker-compose setup to spin up a dev environment with a database, some fake data and a worker to play around with. I will update with the learnings from that and whatever else I try!
If you have suggestions or would like to help, open an issue on the repo or send me and email.